Showing posts with label Fare. Show all posts

Monday, July 21, 2014

Oatmeal Applesauce Cookies... With Cream Cheese Frosting

A few weeks ago, my friends and I got together for some wine, gossip, and eating. I, as always, volunteered to bring dessert. I was then going though recipes to try on my Pinterest page (do you follow me, you should? I have a great eye for food that's delicious... and not always good for you). The Viking and I were discussing options, I wanted these apple sauce muffins I used to make as a kid and he asked for oatmeal cream pies... Vikes went into the kitchen to see if I needed any oatmeal, while I inventoried what I needed (apple sauce, obvs.) and informed me that I have two big containers of oatmeal. Each container is two pounds... I have FOUR POUNDS of dry oatmeal. WTF. How does that even happen? Clearly I need to cook with more oatmeal... because four pounds of oatmeal isn't going anywhere.

So, I combined a few recipes of apple sauce cookies and oatmeal cookies, then found a few apple sauce oatmeal cookies. None of the ones I tried turned out well, so I created my own. As always, you are welcome.

Here's what you'll need:
1/4 C of soften butter (1/2 a stick)
1 C of brown sugar
1/2 C of white sugar
1 egg
1/2 C of apple sauce (I like the old fashioned, well blended, smooth type)
2 1/4 C of flour
1 3/4 C of oatmeal
1/2 t of baking soda
1/4 t of baking powder
1/4 t of sea salt

Preheat your oven to 350 degrees. Line your cookie sheets with silicon, parchment paper, or spray it with some cooking spray (these guys are sticky!)

In a large bowl, cream your butter and both sugars together until smooth. Combine the rest of your wet ingredients (apple sauce and egg) until the batter is smooth. In the same bowl, add one cup of flour and one cup of oatmeal, and the rest of your dry ingredients (baking soda, baking powder, and sea salt). Mix until smooth. Mix in the rest of your flour and oatmeal, a little at a time, until everything is well blended.

Scoop out your batter (with a spoon or ice cream scoop) onto your lined cookie sheets. Keep them at least two inches apart - these guys have been known to spread out.

Bake for 14 - 16 minutes. Let cool (for 30 minutes) and frost! I recommend cream cheese frosting. 


Sunday, July 20, 2014

Cream Cheese Frosting Perfected


Generally on Sundays, I try to attempt a new recipe or two. The fruits of these labors are then brought to dinner with family or friends that night or to work the following day. When you bring homemade cookies to the office, it's hard to have a bad Monday. From there, I have been known to discuss how relaxing I find baking. The speech then goes into "two sticks of butter, a cup of sugar" and I rattle off cookie ingredients with a giant smile. (I'm fully able to admit I lurv creating things in my kitchen).

You know what goes great with cookies? Frosting. As many of  aware, cream cheese is the best frosting ever.  If you disagree, clearly you're a communist I suggest you try this delightful frosting. It's so easy and adds the perfect sweet tang that you didn't even realize you cookie needed. 


Here's what you'll need:
1 8oz block of Neufchâtel cheese
2 cups of powdered sugar
1 tsp of vanilla

Use a stand mixer or hand mixer, add you softened cheese and one cup of powdered sugar. Mix it on low (you don't want ALL the powdered sugar exploding). Once it's well blended, add the next cup of sugar and the vanilla. Blend and blend. It magically turns into a smooth shiny frosting. Yum! Feel free to add more powdered sugar if you like your frosting a little dryer. (I do mine by look and taste... Because I've apparently had a ton of practice).


Yep, that's it. If you haven't jumped on the Neufchâtel bandwagon, welcome to it. It's just like cream cheese in flavor, but it's made with milk, versus milk and cream - like cream cheese. Being that it is milk in the fermentation process (cause that's how cheese is made...), it had less fat that regular cream cheese. It's also a little more moist than cream cheese. It's fantastic. 

A little food coloring and a piping bag and you'll have the perfect cupcake frosting too! But this batch goes to some delightful cookies!
Frosted Cookies
                                         

Wednesday, July 2, 2014

What's For Dinner: One Pot Turkey & Bean Chili


The name doesn't exactly roll off the tongue, but yum! This recipe has been handed down from my great grandfather (seriously) to my grandmother, who shared it with her daughter-in-law (my mother). The best part about this dish, besides it being really yummy, is that it is incredibly easy to personalize to your flavor palette. My grandmother makes it a hearty beef and tomato chili, my mother a spicy, low sodium turkey chili, and my sister makes it vegan! I personally am a huge fan of beans in my chili, but I also make mine a white chili. 

Technically it's name could be One Pot Three Bean White Turkey Chili. We all know it's an absurd name, so we just call it chili. 

For my One Pot White Chili, here's what you'll need:
1 lb of lean ground turkey
1 medium white onion
3 cloves of garlic 
1 8oz. can of tomato sauce
3 Cans of beans (I like pinto, great white northern, and black)
1 C of chicken stock (Or 1 can of cream of 
chicken soup, if you are feeling naughty)
1/4 tsp of cumin
1/2 tsp paprika
1/4 tsp of red pepper 
1/2 tsp of taco seasoning
Salt & Pepper (to taste)


Dice your onions and garlic and throw them in a big pot over medium-high heat. Once the onion starts to soften (and someone inevitably yells towards the kitchen how good it smells) add your meat and start to cook it. (Your meat can be fresh or frozen. It doesn't matter). 


While cooking your meat, chop it with your spoon into little pieces. Once it's starting to brown a little and look cooked, add your secret ingredient: tomato sauce. I don't know why it works so well, but it does. It adds that certain je ne sais quoi.


Add you chicken stock or cream o' chicken (seriously, just use what you have) and your beans. Canned, fresh, two cans, five cans - at this point it's entirely up to you what you like in your chili. Give your pot a big ole stir.


Now it's time for seasoning! I generally eyeball it, so the measurements at the beginning of the recipe are estimations.  Anyway, add paprika, red pepper, and cumin. Stir it again and see what you think. Then, add some taco seasoning (because yum) and some salt and pepper. Stir it again. Let it simmer on low for about 20 minutes.

That's it. So easy and so good! From my family to yours.


Sunday, June 29, 2014

Hey Guys! Let's Make Cheese!

The Viking and I lurv to go to (and hold) small dinner parties (good food, great friends, and decent wine - is there really anything else as important?) As adults in modern American culture, one always offers to bring a dish or drink, usually I'm bring cupcakes (obvs), but while seeing if I can curb my insatiable sweet tooth, I was perusing the interwebz for something new to make and bring. I have been seeing cheese making kits and "easy" recipes for years, so I figure, why the heck not?

Thanks to my friend and yours, the interwebz, I've found that with 45 minutes and four ingredients (five, if you count water) you can have fresh mozzarella!

Anyway, on to the good stuff! My friends: an introduction to soft cheese making.

Here's what you'll need in your kitchen:
1 Large Stock Pot (should hold over a gallon)
1 Slotted Spoon
1 Digital Thermometer
1 Long Spatula or the like (needs to reach the bottom of your pot)
1 Strainer/Colander
1 Microwave Safe Bowl
Kitchen Rat/Assistant - Optional

Ingredients:
1 1/2 tsp of Citric Acid
1/4 c of Water
1 Gallon of Whole Milk
1/4 tsp of Vegetable Rennet
1 c of Water
1 tsp of salt (rough estimate - salt to taste)

Certainly you can find Citric Acid wherever you can find canning supplies. Rennet is a little more difficult, but is easy enough. A lot of places where you can gets craft beer supplies will carry rennet. If you can find either, live somewhere remote, or just want to do what I did, you can by them here and here.

To begin, measure your citric acid into your stock pot. Add 1/4 c of water to dissolve the acid granules. Then add the milk. Over medium heat, bring your liquid up to 90 degrees. Your milk might start looking slightly curdled. This is totally normal. (You'll want to do this slowly, so you can control the temp. If the mixture gets too hot, the cheese curds will compact, causing you to have firmer, smaller cheese.)

Remove your pot from your heat source. Measure out a cup of water and add the rennet in the same
measuring cup. Then add it to your milky mixture. Stir swiftly for 30 seconds. Slow the motion to a stop with your spoon.

Let the milky mixture sit for five minutes.

You have now created Little Miss Muffett's BFF: Curds and Whey. The curds are the white part and the slightly yellowed water is whey - which is FULL of protein.

Once your five minutes are up, grab your long handed spatula-esk tool. Make a grid of your now slightly solid milky mixture. Return your pot to the heat. Heat the whey up to 115 degrees. Again, slowly to control your temperature.

Once you reach your desired temp, remove your pot from its heat source. Using your slotted spoon, separate your curds into your strainer (which can be placed over your microwave safe bowl).

You now have a HUGE decision to make. Okay, not really huge, but you do have a fun decision. At this point, you can dump your whey and get that giant pot out of your cooking space. OR, you can save your whey and use it for cooking, or baking. I've heard you can use the whey for an additive to baked goods, though I don't currently have a recipe for you, since I am TERRIBLE at yeast cooking. Though I intend to get better at it... and then blog about it.


Back to the Cheese:

Shake your strainer and remove as much excess whey as you can. Dump the whey from your microwave safe bowl. Put the almost cheese into the bowl and heat it on high for one minute in your microwave.

When it comes out it will be super hot, but start to look a little smooth. Dump the whey from the bowl and pick up your almost cheese. Squeeze it and begin to knead it together.

Return the almost cheese into the microwave safe bowl and heat for 30 seconds on high. Once this is done, pull out your cheese and dump your liquid. Add salt. Again, crazy hot (be careful). Fold the almost cheese together a few times. Pinch off some of the soon to be cheese for a taste. Does it need more salt? Add some in!

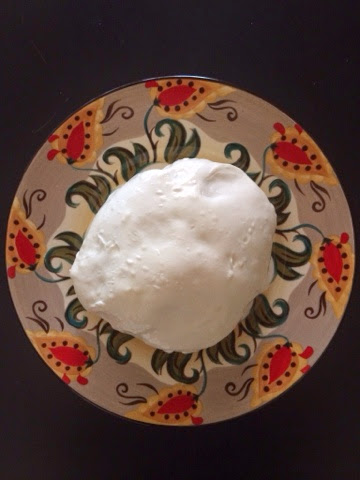
Throw it back in the microwave for another 30 seconds. Continue to dump the liquid and knead the cheese. It will actually start to take shape like the picture. If your cheese feels a little lumpy, go ahead and microwave it for 30 seconds again. If you cheese feels super smooth and starts to turn itself into a ball, assist it into the shape. Then put it in an ice bath.

Be patient for 10 minutes.

Now, my friend, you have cheese! Dress it with fresh herbs, olive oil, pesto, balsamic glaze, slice it, add it to pizza, or just take giant chunk out. Mostly, enjoy it!


Saturday, June 28, 2014

Dandelion: Greatest Flower Ever

Yeah. I said it. That weed of which people try to rid their yards. The "flower" only appreciated by small children. You may be familiar with some of its work, maybe poking through sidewalks? Yep. That's the one. It's AMAZING.

First, did you know it's leaves make a delightful, bitter salad additive? Schmancy restaurants are starting to feature it. Seriously. 

But we're here to talk about the root. Specifically, the root made into a tea. Have you tried it? I would certainly love to hear your opinions on it. If you haven't, my friend, you are in for a treat. While we all understand the benefits of herbal teas (Sleepy time for anti-stress, what what!), I had not tried dandelion root tea until a few months ago. I had read about some mildly frightening blend of water, tea, and additives that will MAKE YOU SKINNY!!!1!!!1! As we know, I'm a skeptic until I've tried it. And I certainly don't believe in any magic drink, pill, or serum. 

Time and time again, we are shown the only way to lose weight and keep it off it diet and exercise. 

I'm not one for diet or exercise. I try to stay active and not eat cupcakes for every meal. But, all that cupcake eating and cheese making (and obviously eating) can make a gal feel a little gross the next morning. This is where dandelion root tea comes in. 


A cup or two of this magical stuff throughout the day (the box suggests one bag per cup, but to three times a day) and the next morning... Less bloat. Dandelion root apparently helps rid your body of excess water weight. 

This tea isn't going to make your fairy godmother appear out of this air, but it will certainly help you feel better tomorrow (and so will a few veggies).


Thursday, February 21, 2013

The Perfect Barbecue!

I'm not a HUGE meat eater. I'll eat poultry, seafood (if that officially counts as meat), and rock some pork/ham from time to time. But, I lurv to cook because it's pretty relaxing for me and the reward of eating whatever I've made is always a good incentive.

As I've complained a few times now, I'm busy! Not at busy as someone with kids, but still, I've got a lot of plates in the air. I will admit it now - I've turned to crock potting. Originally I wouldn't fully fess up, since the cream of whatever and block of cream cheese - though amazingly delicious - is not healthy. I know, you may have to sit down from that heavy revaluation. I am also pretending to be a healthy person (though anyone who knows my love of cupcakes and chocolate could very easily disband that non truth).

But, here we go, I'll admit it. I really love my crock pot! (And I got a brand new time included pot for Christmas. Thanks Sir Viking!)

Okay. Barbecue. As someone who doesn't really like condiments, I've never fully understood the love of meat (bah) smothered in a smokey, spicy ketchup like sauce, until recently. I had pulled chicken and was allowed to dispense my own sauce. I finally understood. The delicious smoked meat is so juicy! Yum.

Knowing that Sir Viking is southern and enjoy barbeque, I was on the interwebz one day and found this little crock pot gem... and believe me, this is requested about every 9 days. You're going to want to write this down:

1 pork tenderloin
1 can of root beer

Place in crock pot on low for 8 hours. At the end of the time, the meat will be tender enough to shred with a fork.

And it is.

Seriously. Combine the TWO ingredients in the picture. That's it.

Apparently the root beer acts as a tenderizer to the meat and gives it a sweet, herbal taste with a slight effervescence. It's friggin' fantastic people!!!

Once we're hungry, we use pretzel rolls (yumz!), I add cheese for me, and a little sweet barbeque sauce for each of us.  Add a side salad and you have a perfectly delicious meal! AND since there are only two of us, we always have leftovers.

Sunday, February 3, 2013

Football Party Bean Dip

I am a college football fan. Professional football, in my humble opinion is only good for beer and food. Otherwise it's a bunch of superstitious crazies or bandwagon "I live near here, so I'm going to be a fan" types. Bah. College football is way better to watch.

Living in a part of the country that adores football and there being a mildly large game tonight... I wanted to share my favorite go to for a football viewing party. Mexican Cheesy Bean Dip!!!


It's so crazy easy.

2 cans of refried beans
8oz. cream cheese
8oz. sour cream
1 pk taco seasoning
2 C cheddar cheese

Preheat your oven to 350. In a big bowl, combine the beans, cream cheese, sour cream, taco seasoning, and 1/2 c of cheese. Spread it in a 9 x 13 dish (consider a disposable baking pan if you are not hosting) and sprinkle the remaining cheese on top. Bake for 20 minutes or so.

Done!

It's so good! I suggest a strong tortilla chip or one that can scoop easily. It's pretty heavy and you're going to want to eat a lot. For healthier options - consider vegetarian or fat free refried beans, skim milk mozzarella cheese, low fat or fat free sour cream, and neufchatel cheese instead of cream cheese (it takes nearly the same, but has less fat). Also consider ranch or fajita seasoning or hot sauce for a fun twist.

Sunday, May 27, 2012

Road Trip Crack Trail Mix

Quite name, huh? Well, I wasn't the one who named it (though it sounds like I should have!) Anyway... since I'm allergic to nuts, trail mixes are a tough one for me. But what's better than a trail mix when going on a trip (or trail?) A little salty, a little sweet. Yum! Well, I was at a wedding a few years back, my problem was solved!!! In the hotel gift bag was a nut free trail mix, called "crack". Seriously.

Here is what you need:
1 box of cap'n crunch
1 bag of gold fish
1 bag of m&ms
1 bag of pretzels
1 bag if bugles (I get the BIG bag)
2 bags of yogurt covered raisins

Take two gallon size zip lock bags and divide everything amongst the bags (Obviously a bag of raisins for each). Toss the bags around a little to mix... And you're done!!!

Here's my favorite part: substitutions!!! Don't like cap'n crunch? Use Cheerios or Chex. What flavor of gold fish are your favorites? Use them! Peanut m&ms? Go for it. Regular raisins and some other dried fruit? Yummy! I sometimes even add chocolate covered pretzels!

The possibilities are endless, and it's all so good! Just use what you like, or better yet, what you have around your house!

Wednesday, May 16, 2012

Homemade Kahlua

When I was visiting family a few weekends ago, my lovely aunt shared this with me... and it was so delicious, I figured I should share it with you!

Homemade Kahula

2 1/2 c  Boiled Water
4 c White Sugar
2 oz Instant Coffee
2 t Vanilla
1 Pint Vodka
1 Pint Brandy

Directions: Boil the water. Add all the ingredients. Let cool. Drink. A lot.

So easy, right? And SOOOO good.

Thursday, April 19, 2012

Agave Nectar of the Gods

Let it be known, I love agave nectar.

When my sister said to me three years ago "agave nectar is a common honey replacement in vegan households" I scoffed. A honey replacement. Please. Could never happen. 

Fast forward to about a year ago, I was house sitting for my parents. As always, I was looking for a snack. And as always, my mother's pantry is filled with nuts. (Some of you may or may not know, I'm allergic to nuts.) I did find one bag of healthy choice popcorn. Barf. But I needed something to munch. So, I grabbed four bowls and divided the popcorn amongst them. One bowl was kept plain, one with cocoa powder, one with Old Bay seasoning, and one with, whomp whomp, agave nectar. 

And at that moment, my life was changed. Yum! Within the next week, the honey at my house was gone and replaced by agave nectar. 

Agave nectar, if you haven't tried it, is light and sweet. It is less sticky than honey, doesn't give you that horrible throat scratch when you've had too much, and has a light fruity, vanilla taste at the very end. 

Try it with your tea or coffee, to sweeten cookies, or my favorite with goat cheese on crusty french bread. Yum! The best part, yes, it's vegan. No animals are harmed when it is made AND it comes from a plant, so you aren't destroying an animal's habitat and hard work, just to sweeten your biscuit. Yep, agave nectar is great on biscuits too! You've never tried it? You can thank me later.

Monday, March 19, 2012

Fried Goat Cheese Salad

Last week at dinner and decided I wanted something light to eat. So I ordered a spinach salad... But it wasn't a regular salad. It was a magical salad. It was fresh spinach, a hibiscus infused agave vinaigrette, with mandarin oranges. Yum. But it gets better. On top was inch thick disk of fried goat cheese.

Holy Crap!

For those of you who have never indulged in fried goat cheese.. you are missing out. It's crunchy, savory, fully of flavor, and mixed with the hibiscus infused vinaigrette - how perfect. It was one of those meals that makes you stop and savor the moment. It was heaven.

Wednesday, January 25, 2012

Turn Juice to Alcohol

This is SO great! I found this kit while trolling the interwebz looking for Valentine's Day presents for my boyfriend. Maybe not his dream gift, but for $9.99, it's a great science experiment for me! 

Here's what happens: You buy some juice, any flavor you like. You empty this yeasty packet into the juice bottle and stop it up with the airtight stopper that comes with the package. You let the juice sit for 48 hours. While it sits, the yeasty mix converts the sugar in the juice to alcohol. The best part, since it's you making it, if you like it after the first 48 hours - go ahead and drink it. If you don't like the sweetness, just let it sit longer. The longer it sits, the more dry the juice becomes. You make it how you want it. How cool is that?  
Find it here: spikeyourjuice.com

Tuesday, January 3, 2012

Lemon Bars

I'll be the first to admit it, I'm new to lemon flavored desserts. I love chocolate, caramel, and sugar... Why should I waste my time with lemon. Silly me. Lemon desserts are sooooo good!

I have the most wonderful client who just brought me the most beautiful bag of lemons! (three cheers for citrus season in florida!) Here is what I did tonight with these beautiful, tangy lemons.

Lemon Bars
Here's what you'll need:
2 sticks of softened butter (trust me - it's got to be soft!)
2 cups of regular flour
1/2 cup of white sugar

4 eggs
1/4 cup flour
1 1/2 cups of white sugar
2 lemons - squeezed

1. Preheat your oven to 350. Mix you butter, 2 c of flour, & 1/2 c sugar together. Once dough forms, spread in the bottom of a 9x13 dish. Bake for 20 minutes or until golden brown.

2. Mix the remaining ingredients in a bowl. Once your crust is done, pour your lemon mix in.

3. Bake for 20 more minutes.

4. Remove from oven (will firm up as soon as it cools down).

5. Totally optional, sprinkle with powder sugar once cooled & out of the oven.

Yummy! Enjoy - because I am right now. (I'd leave a pic, but I ate it all!!)

Thursday, December 29, 2011

Cranberry Lemonade

One of my roommates in college used to create the most amazing cocktails - with things found in our 'fridge. She would pull everything out and just started dumping things together. So, in honor of her (and since she's having her first child in a few weeks - my, have we grown up) let me share my latest cocktail creation

You'll need:
Absolut citron
Bacardi limon
Cranberry juice
Soda water (or sprite, if you like a bit of sweetness with your drinks)

Dump them all in a big bowl, being a bit heavy handed on the liquor - tasting as you go. Once you're happy with the taste, take the cranberries I told you to stick in your freezer a few weeks ago, and put those in your bowl as well. They'll float at the top and look so pretty!

Hunch punch? Maybe. Delicious? Always.

Thursday, December 15, 2011

Cranberries: Winter's Garnish

I love this time of year. Not just for people's cheer and mildly improved attitudes - but for the change in decorations. (I even try to dress in season!) This evenings blog is brought to you by the tangy, ruby colored nuggets that are cranberries. 

These versatile little guys are perfect for so many things this season! Here are my top three uses for cranberries.

1) Make sauce!
Cranberry sauce makes everything delicious (and feel so festive). All you'll need it a bag of cranberries and white sugar - over medium high on your stove. They will cook down perfectly and you can add them on top of almost anything (like Baked Brie!)

2) Decorate!
Add cranberries to the base of a candle, on the side of a platter, in a cluster with a flower arrangement... You get the idea. Cranberries add a touch of color to any decorating you're doing this season.

3) Chill!
My absolute favorite use for cranberries in the winter, is in drinks. They don't even have to be cocktails (though they might as well be!) All you do is take a bag of cranberries, throw them in the freezer, and when the time comes, place them in a drink rather than ice cubes. Your drink won't get watered down, it will just look festive and have a tangy hint of delicious in it!

The best part, cranberries are buy one get one free at Publix this week! So get some and make your holidays festive (with no too much effort!)

Wednesday, December 14, 2011

Easy Brie...zie

I couldn't resist with the title.

With the big party weekend coming up, some of you may be required to bring a dish of sorts. Instead of your typical and expected bottle of wine - bring a baked brie! It's so good and ALWAYS a crowd pleaser.

Here's what you'll need:
An oven, a baking sheet, crescent rolls, and a round (or slice) of brie.

Here's what you do:
Preheat your oven, following the directions on the crescent roll package. Unwrap your crescent rolls, place your brie inside (leave the white cheese skin on). Wrap your cheese completely, with your fingers, squish the seams together, so there is no cheese peaking out. Bake following the directions on the package (or until lightly browned)

That's it. Seriously. 

Put it on a festive platter (I love to get them for super cheap at IKEA with crazy patterns), grab a box of crackers - whatever you prefer (fancy water crackers to classic ritz all work!), and decorate with fruit (I suggest green apples - always!, as well as grapes, cranberries, or raspberries). If you want, a yummy raspberry, fig, or balsamic drizzle would dress it up nicely. 

I promise your host/ess will love it, the other guests will ask for the recipe, and you will have a new go to appetizer to bring whenever/wherever you need!

Monday, December 5, 2011

Minon Cupcakes!

Have you seen the movie Despicable Me? It came out in the summer of 2010 and I have been in love with it ever since. Not the heart warming message (I mean yeah, it's nice, whatever), I love the little yellow, sometimes evil doing, overall wearing minons. They don't even speak English... or really at all. They just squeak and babble at each other. They are so cute and funny they make it difficult for me to function.

Now, you may or may not know - quite possibly my favorite thing on the planet is the cupcake. They are the most perfect, hand held little bits of delicious cake. They are usually so cute on top with some sort of decoration. Love, love, LOVE cupcakes! They are perfect for any occation and always taste delicious!

As luck would have it, I have a lovely friend who understands my deep, deep love of both minions and cupcakes and gave me the grand idea of combining the two.

Here's what you'll need: cake mix (any type you like), cupcake pans, cupcake liners (I use blue or silver foil), frosting (white or dyed yellow are probably best - but I also stand by using whatever tastes good with what cake you made), two tubes of black gel icing, smarties, chocolate sprinkles, and twinkies. 

Step one: Bake your cupcakes, let them cool (at least 1 hour, if not longer), and lightly frost the top (using about 2/3 to 3/4 of the can).
Step two: Unwrap your twinkies and lay them out on a flat surface. 
Step three: Take white smarties and your leftover frosting, lightly slather the back, and stick them (in sets of two or just one) onto the front top of the twinkie.
Step four: Take your black gel icing and draw around the smarties to make goggles, then around the "head" of the twinkie. Next make a little smile, grimace, whatever for your minion and dot inside the smartie for eyes.
Step five: Take the chocolate sprinkles and stick them into the top of the "head" of the minion twinkie.
Step six: Slice the twinkie in half, thus making two minions. Don't be afraid to make them uneven, after all, minions come in all shapes and sizes.
Step seven: Slather a bit more frosting to the bottom of the cut in half twinkie and stick them to your cupcakes. 
Step eight: Eat and enjoy!

I promise these little guys will be a hit at the party and you'll be so proud you made them! Just trust me on this one :) And watch the movie if you haven't seen it!!!

Thursday, November 3, 2011

Samuari Melonade

The Samurai Melonade is a delicious drink I found at a sushi restaurant in college and have been making them for parties ever since!

Here's what you'll need:

Bacardi Lemone (or any lemon flavored or infused rum)
Watermelon Pucker
Lemonade
One big ass pitcher

I have two recipes, one for more relaxing parties - and one for a little more trouble (the original recipe)

My cooled down version:
- 1/4 of the pitcher of rum
- 1/4 of the pitcher of pucker
- Fill the rest of the pitcher with lemonade.
- Stir & serve over ice

The true version, for a little more trouble
- 1/3 of rum
- 1/3 of pucker
- 1/3 of lemonade
- Serve over ice and go crazy.

Yum. Now consider, this with pomegranate liquor or blueberry? Could be amazing as well. I may have to try these this weekend...

Herb Crusted Fish in White Wine Tomato Sauce

Yum!!! This is one of my favorite recipes - and it's so easy. And I promise that everyone who has it will be convinced you are the best cook around!

Here's what you need (to feed 4):
4 white fish fillets (I use tilapia or halibut - whichever is on sale at the grocery that week)
2 medium size tomatoes (diced) or 1 can of diced tomatoes (for those of you who are semi-homemaders)
Fresh basil (about 8 to 10 leaves)
Fresh parsley (a handful or so of leaves)
1 cup of dry white wine
Cooking oil or butter
Salt & Pepper

1) Rinse your fillets, pat them dry, then salt & pepper to taste.
2) Chop 2/3 of your basil & parsley, then press the flakes into the flesh of the fish
3) Cook your fish on medium high using your preference of butter or cooking oil - about 3 - 4 minutes on each side. 
4) Place cooked fish on a serving dish (though I sometimes use a casserole dish to hold in the sauce)
5) Leave your skillet on medium to medium low and add in the cup of white wine. Use a spatula to scrape the brown bits up and let the wine reduce by a third.
6) Add the last of your herbs and diced tomatoes (strain if using a can) to the white wine. Let these heat through.
7) Put your tomato white wine sauce on your fish - then serve!

I usually serve steamed veggies with it (which I add a olive oil and sea salt to). I can't even tell you how easy it is, until you try it - and it is requested at least weekly at my house. I promise if you're not good in the kitchen - you'll look like a hero. If you love to cook - this will quickly become a favorite!

Friday, October 28, 2011

Quick Tip

Just a thought to share with you, my lovely reader... Don't salt your food until you've tried it. Believe me, I like salt as much as the next person (maybe even more) but lately I've seen people salting their food as soon as they receive it.

Stop! If you haven't tried the food yet, how do you know it isn't already salty? Psychic taste buds? I think not. And what's more! You might offend you chef! When I cook, I happily use tons of spices, herbs, garlic, etc. Salting it immediately would suggest you are using the salt to cover the flavors I so painstakingly put in your meal! (but you've read about the way I like to cook... so maybe painstaking isn't the most optimum word. heh.)

Regardless, think (and taste!) before you salt. You might not even need it.